There are two possible ways of installing CleverMaps Shell - locally and using Docker.
- To install it locally, you have to:
- Install Java Development Kit - JDK
- Download Shell .jar file
- Run it in cmd.exe or Terminal
- To install using Docker:
- Download and install the Docker platform
- Pull the latest Shell image
- Run it in a Docker container
Local installation
CleverMaps Shell runs in Terminal on Unix systems (Linux, Mac OS) and in cmd.exe on Windows systems. If you're not familiar with these tools, we recommend to complete a basic usage tutorial on the web.
We've encountered character encoding problems on Windows 7. It is recommended to use Windows 8 or higher.
To run Shell locally, your machine must have the Java Development Kit, version 8+ installed. To check if you have JDK installed, open Terminal or cmd.exe and run this command.
| Linux/Mac/Windows |
java -version |
If you receive a version number back - you have installed JDK already and you can skip to the next step.
Otherwise, we recommend to download Java Development Kit - JDK 11 from Oracle:
Choose the installation file according to your platform, and follow the installation instructions. You can also opt for the open source version - OpenJDK.
After you have successfully installed JDK, download the Shell executable file from this page. Navigate to the folder where you've downloaded the Shell, and run it using a script distributed with the executable .jar file. The script must be located in the same folder as the .jar file.
| Linux/Mac | Windows |
|
|
Where <path> is the path to the folder where you've downloaded Shell to.
Alternatively, run it directly using the java command:
| Linux/Mac/Windows |
|
Where the actual name of the jar (can-shell-1.4.0-RELEASE-exec.jar) may be different - depends on the version you've downladed.
Configuration
After you have successfully started Shell, we recommend you to set up your config and credentials, so you don't have to enter them each time you log in.
You can log in using either credentials, or access token (recommended).
Log in using access token
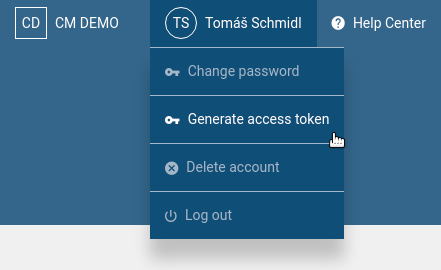
First, log in to to application and on the Project page, hover your profile name and select Generate access token. You will be prompted to log in again, and then you'll receive your access key.
Then run Shell and use the setup command to setup your access token.
| Linux/Mac/Windows |
|
Log in using credentials
Please note that if you created a CleverMaps account using social login (Facebook, Google) you will not be able to use the same credentials you use for these services. In this case, you will have to generate an access token. See the previous section.
To log in using credentials, run Shell and use the setup command to setup your email and password.
| Linux/Mac |
|
| Windows |
|
Your credentials and config files will be stored in your home folder in the .cleverMaps directory.
Are you connecting through a proxy server? Set your proxy config using: setup --proxyHost proxy.example.com --password proxyPort 3128
Docker installation
To run Shell in Docker, your machine must have the Docker container platform installed and running. You can get Docker here.
This image runs the lightweight Alpine Linux and already contains the Java Development Kit. It's always distributed with the latest version of Shell.
| Linux/Mac |
|
| Windows |
|
Where:
--rmtells Docker to not persist the container for later use--namespecifies the name of the container--volumebind mounts a volume, where/tmp/dumpsis the local directory the image will use, and/workis the path inside of the container- all dumped metadata and data will be located here (though Shell will indicate that the files were dumped to the
/workdirectory) - you can specify whatever path you want, e.g.:
C:\dumpson Windows
- all dumped metadata and data will be located here (though Shell will indicate that the files were dumped to the
--env-filespecifies the path to an environment variables file- in our case this is the credentials file with your email and password we've created in the Configuration section above
-tiallocates a terminal so you can directly interact with the container, and also keeps the standard input openclevermaps/shell:latestis the name of the latest image
Info for Linux/Mac OS
Depending on your Docker system configuration, you may be required to preface the docker run command with sudo.
In that case, all files saved to the directory you specified in --volume have to be edited by the root user. Make sure you run your text editor under root user as well, or change the dump directory file permissions accordingly, e.g.: by using sudo chmod -R 777 /tmp/dumps/.
If you've already pulled the image and Shell tells you that you're using an old version during startup, update it by using:
| Linux/Mac/Windows |
|
Usage tips
Shell Docker images are hosted in this DockerHub repository.
There are some useful tricks, which will make the work with Shell much easier:
- reverse command search - using the Ctrl+R shortcut, you are able to search through your command history (stored in spring-shell.log file in the Shell working directory - not available for Docker installation)
- Ctrl+R → type "k5" →
openProject --project k5t8mf2a80tay2ng
- Ctrl+R → type "k5" →
- command completion - using the Tab key, Shell will finish the command/parameter, or list all available commands/parameters
lo→ Tab → loginli→ Tab →listProjects,listDumps→listP→ Tab →listProjects
- command history - by pressing the Up and Down arrow keys, you can navigate through the command history
Having trouble with installation or configuration of CleverMaps Shell? Don't hesitate to contact us at support@clevermaps.io.
To learn more about Shell and the platform - please complete the CleverMaps tutorials. Detailed command description of Shell commands can be found in the command list article.